In retrospect I wonder why I just had to have these chairs. I knew they needed work when I bought them, I just didn't realize that meant weeks in intensive care.
 In my defense, they don't look too bad here, do they?
 You would have fallen for them too, right?
 Beautiful lines...who could resist?
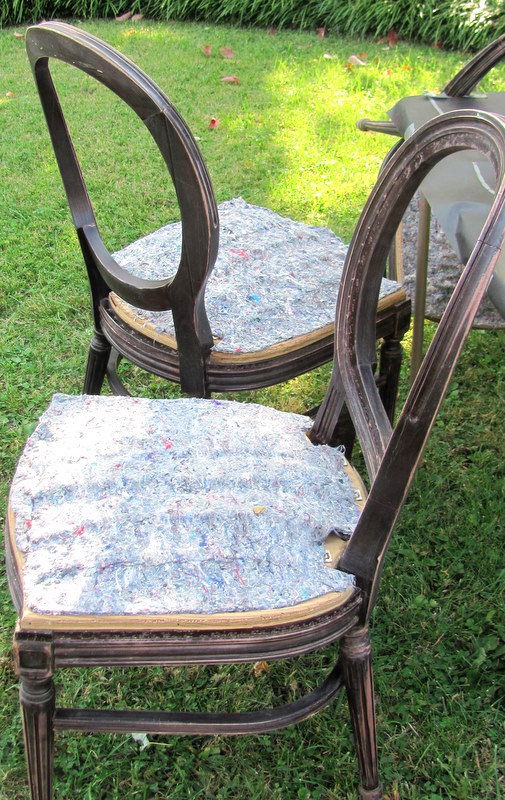
 I started by removing the upholstery.
 Not only nail heads, but lots and lots of staples.
 And then more staples that were holding the foam in place.
 Once my hands recovered from pulling staples, I was ready to examine the chairs for structural defects.
 The curved parts had put too much stress on the dry wood and they had started to pull apart.
 With only four clamps in my arsenal, this took awhile.


The feet had taken a beating and there wasn't much I could do to bring them back to the original tapered lovliness.
 I added glide pegs and hoped that would be enough to halt the deterioration.
 Next came a coat of primer and this is how they stayed for months. Since I was planning to move, I didn't want to be premature with the selection of fabric or the color I chose to paint them.
Once I decided to take my house off the market, I was free to select the fabric.
 I chose this for the seats and the inside back. I opted to go with a double welt piping instead of nail heads. It's not that I don't like that look but this is a little more streamlined and, I might add, less expensive.
I wanted something different on the outside backs and it took me quite awhile to settle on something.
 I finally selected an alphabet style I liked from The Stencil Library. If you are searching for stencils, I highly recommend The Stencil Library. These people are a delight to work with and go above and beyond to help you with your selection. I may have mentioned this in another post but it bears repeating.
 I used the first and middle initial of one of my grandchildren on each chair.
 Four chairs and four grandchildren made that come out just right. Three of them have the middle initial of M and I was also able to use the letter A twice so that meant only purchasing 5 letters total.
 Because some letters were wider than others I had to play around with the arrangement. It turns out that it looked better to stagger the girls names from high to low and the boys names from low to high. I think it just makes it more interesting as well.
 I tried to give the chairs personality without being too bold. This room has a dramatic houndstooth rug so a little restraint was in order.
 I tend towards the colorful, and the sometimes flamboyant in my decorating, so I need to rein that in on occasion. You'll have a better sense of what I'm referring to as I show you more of this room in future posts.
I am linking to: Cowgirl Up Link Party
Common Ground
French Country Cottage
Miss Mustard Seed


The feet had taken a beating and there wasn't much I could do to bring them back to the original tapered lovliness.


Once I decided to take my house off the market, I was free to select the fabric.

I wanted something different on the outside backs and it took me quite awhile to settle on something.


I am linking to: Cowgirl Up Link Party
Common Ground
French Country Cottage
Miss Mustard Seed
Wow. Your creative energy is unbelievable. They are beautiful.
ReplyDeleteWhat an interesting concept to even more personalize the chairs with grandchildren initials! At first, I thought you did these for me since my name is Terry Moore...TM! Beautiful
ReplyDeleteSimply stunning transformation!
ReplyDeleteDid you have them upholstered or did you do it by yourself? Very lovely.
Nancy
http://wildoakdesigns.blosgspot.com
Beautiful chairs~ I absolutely love them and would have bought them too!! Love the monograms~ thanks for linking up at Feathered Nest Friday!
ReplyDelete